I got this neat electric bike/scooter last weekend. I'm so impressed with it and wanted to share it on the blog.
Normally when I travel, I'm going to more rustic areas (with trails) and carry either a regular mountain bike, or an electric mountain bike. Both of these bikes are terrific for their intended purpose.
But when I go down to the beach, or the Keys, something more like a scooter would be more practical and fun.
The problem is, gasoline powered scooters are kinda pricey, heavy and are another thing I have to service and maintain. Since I like my essentially maintenance free electric mountain bike so much, I started searching for a scooter with a similar drive train.
I found it in the Jetson Electric Bike. They are relatively light and are Federally classified as a bicycle. So no registration, no licensing, no helmet required, etc. So for my use, it's just about perfect!
Here's a link on Amazon: Jetson Eco-Friendly Electric Bike
I also made this review video of the bike and it's features. Be sure to listen to the part on how to find a bargain price on this item!
Tuesday, April 28, 2015
Sunday, April 26, 2015
Travato Battery Project
Well, the project has begun to add a 2nd house battery to the Travato!
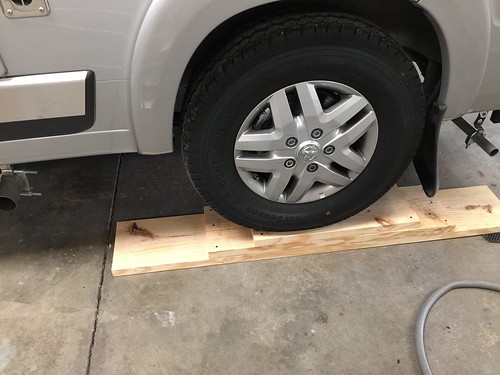
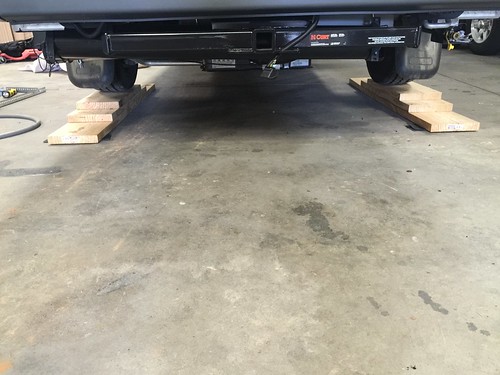
Step one was to build some ramps to give me some working room. I got some 2 x 10"s and had Lowes cut them up for me (cuts are free when you buy wood there). 5', 3' & 2' lengths. Nailed together. Works great, van rolled right up on them. With a couple strips of old rubber floor mat to hold them in place. In hindsight, it may have been better to have these graduated only on one side (instead of the up and over you see below) - that would have given me more room to crawl under the van between the wheel and tailpipe. But I thought this configuration was safer in case I rolled too far. These ramps will be ideal when I need to service the generator, as I'll crawl under from the back of the van.
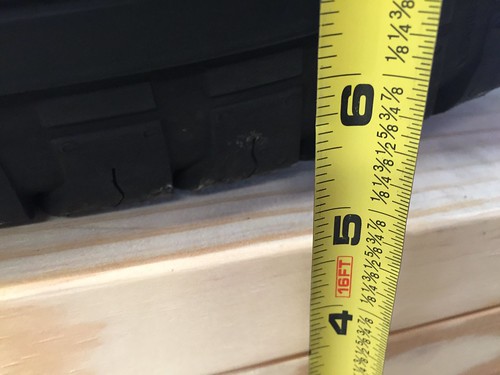
Almost 5" of extra clearance:
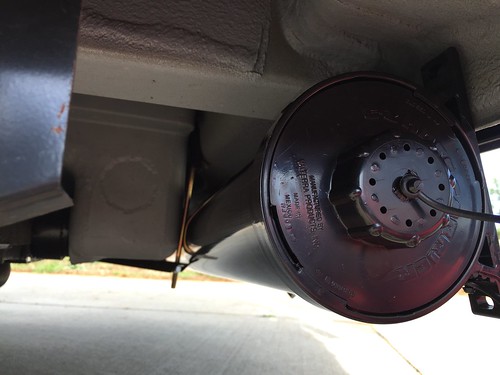
I also got started on removing the battery:
It's tight - you can see the limited clearance above the battery:
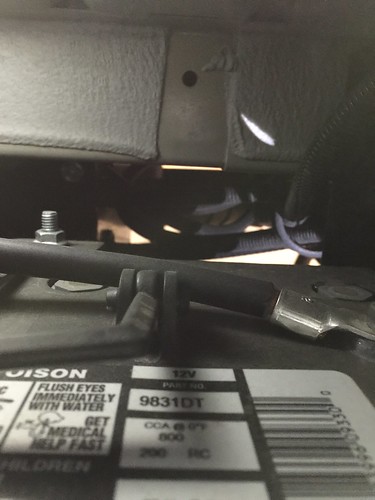
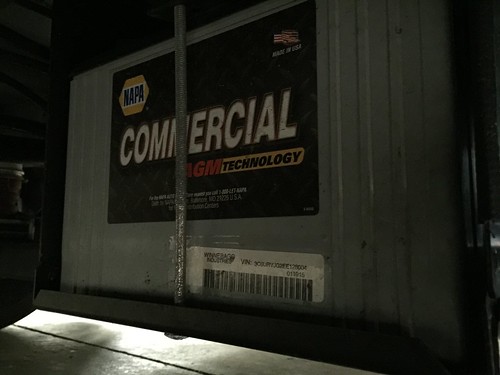
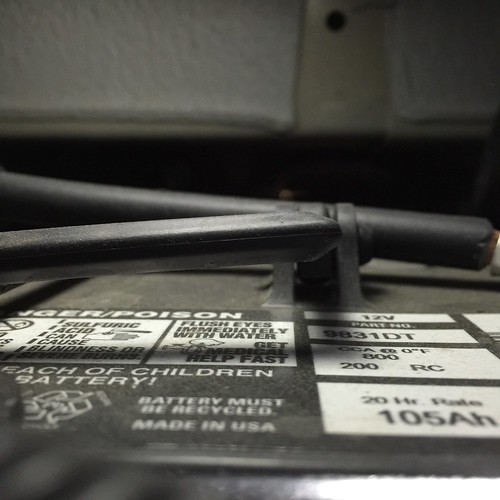
The battery is a NAPA Commercial AGM part number 9831DT
I got the battery out, all my metal parts cut and wiring connected. I think I spent more time changing out the wood blade for a metal cutting one on my chop saw. It really is an effective blade - kinda works like a big grinder. I was also able to sand down any burrs from the cutting with the edge of the blade.
Next the battery gets picked up and I bolt it all back together. One thing I learned - you need to use a floor jack to get the battery back in position. Even with the extra room, it's near impossible to lift a 69 lb battery back up into the frame. Just no room for leverage.
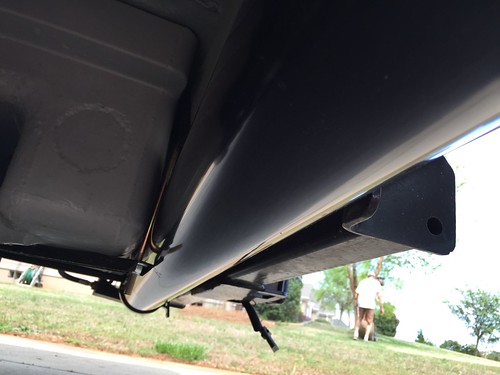
It was really tough getting it to fit in there. The space is tight up against the anti-sway bar.
I ended up having a 1/2" gap between the battery and the bar. I think that is enough. I went on a rather long and bumpy ride and it appears that everything is in there solid and nothing is moving around. Another option, since AGM batteries can be mounted in any orientation, would be to mount this battery on it's side with the terminals facing out. That would clear the sway bar better, but of course, there are other obvious downsides created doing that.
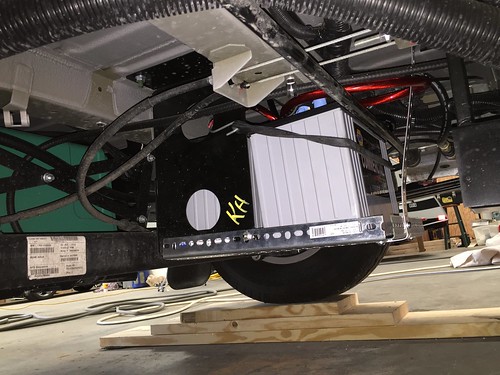
The only way to get the battery in this way (as shown above) is to lift and support it with a floor jack. Then you can bolt the frame pieces in place (one on each side of the existing frame, and one across the front). Then you can let the jack down and install the support strap. There really is no way for it to come out unless you disassemble the metal parts. I used a heavy rubber strap with metal hooks to use as a securing strap. Here you can also see a metal bar I used on the front of the frame to secure that part of the frame. I also covered all my battery terminals with protective tape so there is no chance metal comes in contact with it.
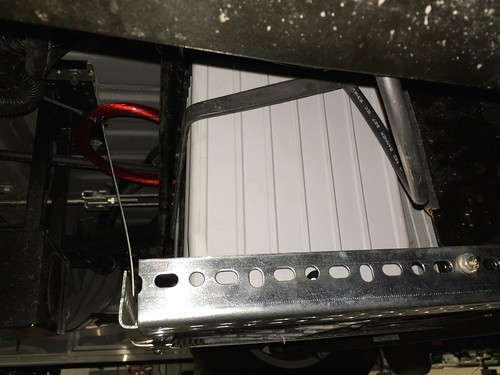
There was one bolt nearby for the gray tank pump assembly I removed and then replaced when I had this strap in place.
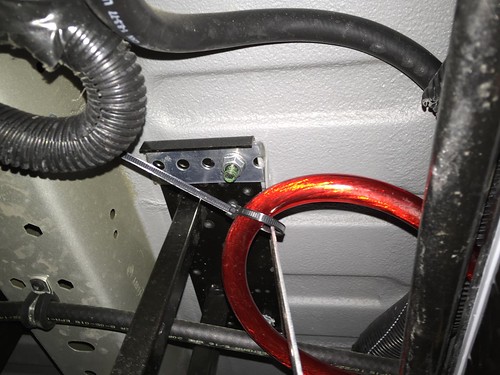
You can also see some of my wiring in the above pic. Believe it's 2 gauge. It's a bit heavier than the existing wiring. I did match Winnebago's color coding - red for pos and black for neg.
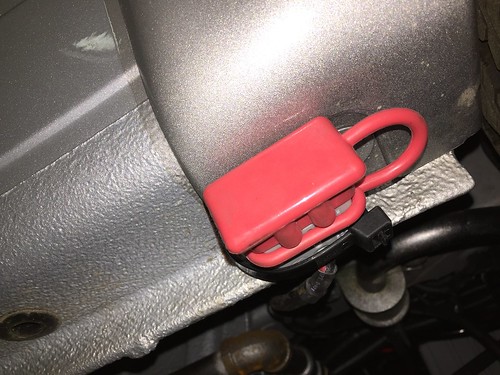
While I was under there, I also zip-tied the connector for my portable solar panel to the bottom of the van near the rear fender. It has that rubber weather cover, so I think it will be alright there.
The project came in at my expected budget. Nearly $300 for the battery and $100 for the materials, a new blade for my chop saw and a new vice to bend metal. So in that regard, I'm happy with how it went. It was just more work than I expected. Now I have 210 amp hours of total house capacity, plus the engine battery.
Step one was to build some ramps to give me some working room. I got some 2 x 10"s and had Lowes cut them up for me (cuts are free when you buy wood there). 5', 3' & 2' lengths. Nailed together. Works great, van rolled right up on them. With a couple strips of old rubber floor mat to hold them in place. In hindsight, it may have been better to have these graduated only on one side (instead of the up and over you see below) - that would have given me more room to crawl under the van between the wheel and tailpipe. But I thought this configuration was safer in case I rolled too far. These ramps will be ideal when I need to service the generator, as I'll crawl under from the back of the van.
Almost 5" of extra clearance:
I also got started on removing the battery:
It's tight - you can see the limited clearance above the battery:
The battery is a NAPA Commercial AGM part number 9831DT
I got the battery out, all my metal parts cut and wiring connected. I think I spent more time changing out the wood blade for a metal cutting one on my chop saw. It really is an effective blade - kinda works like a big grinder. I was also able to sand down any burrs from the cutting with the edge of the blade.
Next the battery gets picked up and I bolt it all back together. One thing I learned - you need to use a floor jack to get the battery back in position. Even with the extra room, it's near impossible to lift a 69 lb battery back up into the frame. Just no room for leverage.
It was really tough getting it to fit in there. The space is tight up against the anti-sway bar.
I ended up having a 1/2" gap between the battery and the bar. I think that is enough. I went on a rather long and bumpy ride and it appears that everything is in there solid and nothing is moving around. Another option, since AGM batteries can be mounted in any orientation, would be to mount this battery on it's side with the terminals facing out. That would clear the sway bar better, but of course, there are other obvious downsides created doing that.
The only way to get the battery in this way (as shown above) is to lift and support it with a floor jack. Then you can bolt the frame pieces in place (one on each side of the existing frame, and one across the front). Then you can let the jack down and install the support strap. There really is no way for it to come out unless you disassemble the metal parts. I used a heavy rubber strap with metal hooks to use as a securing strap. Here you can also see a metal bar I used on the front of the frame to secure that part of the frame. I also covered all my battery terminals with protective tape so there is no chance metal comes in contact with it.
There was one bolt nearby for the gray tank pump assembly I removed and then replaced when I had this strap in place.
You can also see some of my wiring in the above pic. Believe it's 2 gauge. It's a bit heavier than the existing wiring. I did match Winnebago's color coding - red for pos and black for neg.
While I was under there, I also zip-tied the connector for my portable solar panel to the bottom of the van near the rear fender. It has that rubber weather cover, so I think it will be alright there.
The project came in at my expected budget. Nearly $300 for the battery and $100 for the materials, a new blade for my chop saw and a new vice to bend metal. So in that regard, I'm happy with how it went. It was just more work than I expected. Now I have 210 amp hours of total house capacity, plus the engine battery.
Sunday, April 19, 2015
Camco Olympian 5500 RV Grill
With the new van, and not using the Stowaway 2 cargo box, I am trying to reduce what I carry around.
My van came with a low pressure LP port under the back bumper to attach a grill or other accessories. So I was on the search for a non-regulator type of LP grill that was smaller than the Charbroil Grill 2 Go I was using and eliminate the need to carry additional LP bottles.
I found this excellent stainless steel grill on Amazon that looks like it will be perfect:
http://www.amazon.com/gp/product/B0014JN68O/ref=oh_aui_detailpage_o03_s00?ie=UTF8&psc=1
Along with this heavy duty protective carry bag to store it in:
http://www.amazon.com/gp/product/B000EDOTH8/ref=oh_aui_detailpage_o03_s01?ie=UTF8&psc=1
I shot this video showing the features of this grill as well as how to hook it up to the accessory port.
Camco Propane Brass T Extend-a-Stay
Often, an RV will not have an LP accessory port to attach a grill or lp campfire.
I got this 4 port brass T with hoses - also known as an Extend-a-Stay - to attach these accessories on my teardrop trailer.
Often times, the motorhome crowd will use this device to add a supplemental LP tank to their system so they don't exhaust their on-board tank and then have to move their RV to refill it.
http://www.amazon.com/gp/product/B0014JG7RQ/ref=oh_aui_detailpage_o02_s00?ie=UTF8&psc=1
I also bought this accessory to connect a device that normally connects to a 20# LP bottle to those small, green 1# bottles.
http://www.amazon.com/gp/product/B00480BWA0/ref=oh_aui_detailpage_o02_s00?ie=UTF8&psc=1
The following is a video I made showing how to hook up these devices and connect a propane campfire to my trailer's onboard LP tank.
Winegard Rayzar TV Antenna
I got this Winegard Rayzar TV Antenna to use on my teardrop trailer.
http://www.amazon.com/gp/product/B00C5SUOFG/ref=oh_aui_detailpage_o01_s00?ie=UTF8&psc=1
I like it because it's compact and easy to set up. It picks up the HDTV broadcast channels as you'd expect. Around $65.
http://www.amazon.com/gp/product/B00C5SUOFG/ref=oh_aui_detailpage_o01_s00?ie=UTF8&psc=1
I like it because it's compact and easy to set up. It picks up the HDTV broadcast channels as you'd expect. Around $65.
Monday, April 13, 2015
It's Curtains for the Travato!
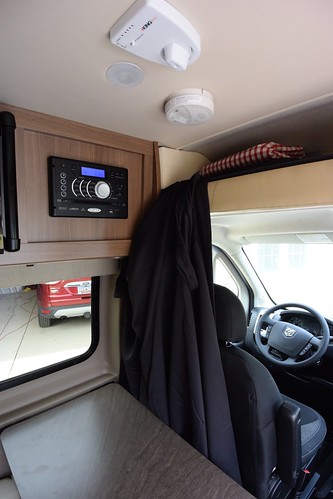
No, we didn't do the van in. I'm talking about window coverings!
The stock cab window coverings in the Winnebago Travato are kind of fiddly and a bit of a PITA. They are not very blackout, plus the mouse-fur material doesn't look like it will hold up very well. The side window covers are held with magnets (not a bad setup) but the windshield cover is a big piece that has to be unfolded, fit in the window, and then fished under the sun visors and velcroed. I really don't like all that, plus it's not very "stealth" if you know what I mean.
So I decided to make a curtain to close off the cab. Well, I had the idea anyways. The sewing was graciously done by my long suffering sister.
First I ordered a black-out type curtain. Wanted something (a) cheap and (b) durable material and (c) big enough to make this an easy project. So I settled on this from Amazon:
http://www.amazon.com/gp/product/B004AKG3TI/ref=oh_aui_detailpage_o02_s00?ie=UTF8&psc=1
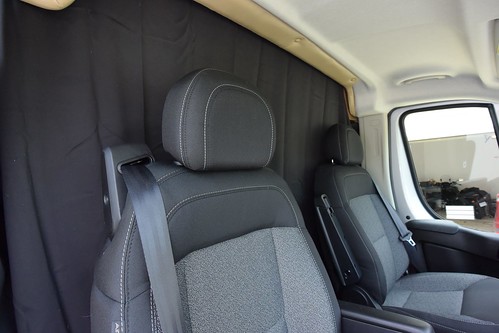
At 100" wide, and 95" tall, it should be big enough to do the job and maybe have enough left over to do the rear window. It's 100% poly and fully black-out. We cut it down to 66" tall and hemmed it. The remaining 29" (with the grommets), we added an 8" piece of fabric to the bottom and fashioned a curtain for the rear windows.
My plan was to attach this panel to the bulkhead at the rear of the cab. The top surface is a hard plastic and would be a good host for a strip of velco. A matching strip would be attached to the curtain panel and a bit down the sides. Easy off and easy on.
So here it is attached to one side of the cab:
Of course you don't have to hang it there, you can always just take it off, fold it up and store it in the bin above the cab.
Here it is attached all the way across - note I left the width at 100" so I'd have a bit of material to work with in the next step.

Here's how it looks outside:
Not too bad, huh? We made a single panel curtain for the back windows that I can hang with a bungee or expanding rod. Not sure though. The stock window covering work pretty well and are held in easy with magnets. They are white though, so you see white in the windows from the outside of the van. Black would be better.
My thoughts were to have enough material to drape it over the captains chairs if I wanted to use them while "stealth" parked.
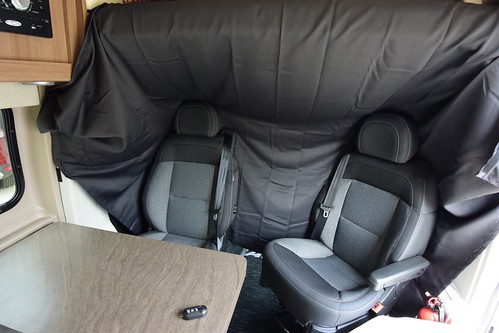
This still needs some work - I will probably sew some loops in the backside of the curtain so a small bungee could attach it somehow to the sunvisors - thus getting it off the chairs and giving you some headroom.
Outside looks kinda disturbing set up this way.

So far, I'm happy with how this turned out. It may need a bit of refinement, but doesn't everything?
I also tackled a couple more projects as well. I found a couple locations to install Valterra tubes to house my coil hose and an extra sewer hose.
There is a spot between the rear bumper/trailer hitch and the black tank. You just wedge the tube in there and it's done:
The other I hung from the roof rack with zip ties. Nice thing about these two items is that they are easily removed if you change your mind.
The last thing I did was add door edge strips. They are just clear plastic mouldings with an adhesive strip inside. You just stick them on the door edge. In the back, this is important as the unknowing could shut the doors in the wrong order and slam the the door lock mechanism into the delicate paint.
You can get them on Amazon for $4 - http://www.amazon.com/gp/product/B001EA0LVS/ref=oh_aui_detailpage_o02_s01?ie=UTF8&psc=1
That's it for now. Next up is a battery project that is still in the planning stages. Stay tuned!
The stock cab window coverings in the Winnebago Travato are kind of fiddly and a bit of a PITA. They are not very blackout, plus the mouse-fur material doesn't look like it will hold up very well. The side window covers are held with magnets (not a bad setup) but the windshield cover is a big piece that has to be unfolded, fit in the window, and then fished under the sun visors and velcroed. I really don't like all that, plus it's not very "stealth" if you know what I mean.
So I decided to make a curtain to close off the cab. Well, I had the idea anyways. The sewing was graciously done by my long suffering sister.
First I ordered a black-out type curtain. Wanted something (a) cheap and (b) durable material and (c) big enough to make this an easy project. So I settled on this from Amazon:
http://www.amazon.com/gp/product/B004AKG3TI/ref=oh_aui_detailpage_o02_s00?ie=UTF8&psc=1
At 100" wide, and 95" tall, it should be big enough to do the job and maybe have enough left over to do the rear window. It's 100% poly and fully black-out. We cut it down to 66" tall and hemmed it. The remaining 29" (with the grommets), we added an 8" piece of fabric to the bottom and fashioned a curtain for the rear windows.
My plan was to attach this panel to the bulkhead at the rear of the cab. The top surface is a hard plastic and would be a good host for a strip of velco. A matching strip would be attached to the curtain panel and a bit down the sides. Easy off and easy on.
So here it is attached to one side of the cab:
Of course you don't have to hang it there, you can always just take it off, fold it up and store it in the bin above the cab.
Here it is attached all the way across - note I left the width at 100" so I'd have a bit of material to work with in the next step.
Here's how it looks outside:
Not too bad, huh? We made a single panel curtain for the back windows that I can hang with a bungee or expanding rod. Not sure though. The stock window covering work pretty well and are held in easy with magnets. They are white though, so you see white in the windows from the outside of the van. Black would be better.
My thoughts were to have enough material to drape it over the captains chairs if I wanted to use them while "stealth" parked.
This still needs some work - I will probably sew some loops in the backside of the curtain so a small bungee could attach it somehow to the sunvisors - thus getting it off the chairs and giving you some headroom.
Outside looks kinda disturbing set up this way.
So far, I'm happy with how this turned out. It may need a bit of refinement, but doesn't everything?
I also tackled a couple more projects as well. I found a couple locations to install Valterra tubes to house my coil hose and an extra sewer hose.
There is a spot between the rear bumper/trailer hitch and the black tank. You just wedge the tube in there and it's done:
The other I hung from the roof rack with zip ties. Nice thing about these two items is that they are easily removed if you change your mind.
The last thing I did was add door edge strips. They are just clear plastic mouldings with an adhesive strip inside. You just stick them on the door edge. In the back, this is important as the unknowing could shut the doors in the wrong order and slam the the door lock mechanism into the delicate paint.
You can get them on Amazon for $4 - http://www.amazon.com/gp/product/B001EA0LVS/ref=oh_aui_detailpage_o02_s01?ie=UTF8&psc=1
That's it for now. Next up is a battery project that is still in the planning stages. Stay tuned!
Sunday, April 12, 2015
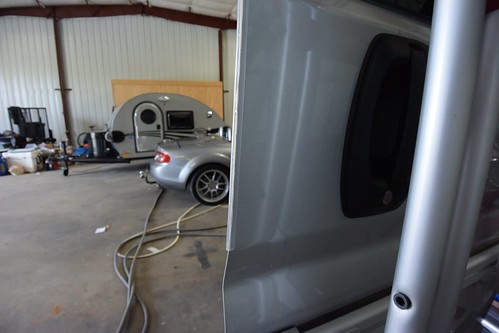
My Teardrop Trailer - 2014 Little Guy T@G Max
Several times a year, I go to Miata car rallies. Not only do I dislike staying in hotels, but I have a hard time committing far in advance if I can even go. So campgrounds near the event can work out very well. A side benefit is it's alot less money than a hotel.
I've had several teardrop style campers and even a tent trailer. When these Little Guy T@G's came out, it seemed perfect for my use. A little taller than your typical teardrop, but still very light and aerodynamic so my little Miata can easily pull it.
Here is a video I shot as a review of this neat little trailer:
Tuesday, April 7, 2015
A Small Coffee & a Side of Toast
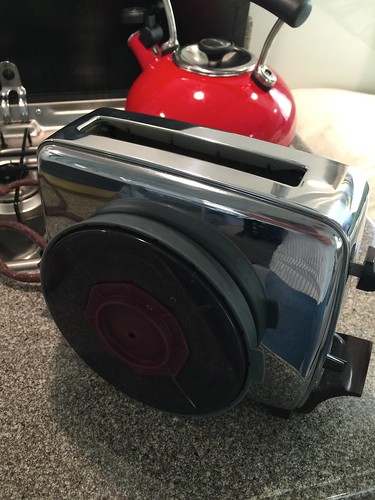
I'm always on the lookout for small space saving appliances to use in the RV.


If you are an aficionado of toasters, check out this cool link: Toaster.org
I have a fairly small 1 cup coffee machine, but I don't like how slow it is, nor the 10-12 amps it wants to run. I read on a blog about a compact drip cup and how much they liked it, so I got this one on Amazon to try out:
It was around $13.
Basically it comes as a plastic puck. The cup itself is silicone. You unfold it, put in a paper filter and set it on your cup as so:
You put a couple teaspoons of coffee in like so:
Pour in the hot water from your kettle like so:
In about 1 minute, the water drips thru and you have a perfect cup of coffee like so:
What is a fine cup of coffee without a slice of toast? I've finally found the perfect compact electric toaster. Look how small this baby is!
This one is vintage - note the fabric cord covering. But it was a museum piece, looks like it came right out of it's original box. Got it on ebay and it works perfectly.
Together, they will take very little cabinet space.
If you are an aficionado of toasters, check out this cool link: Toaster.org
Monday, April 6, 2015
New 2015 Winnebago Travato 59G
Before I had the Oliver built, I used a large 5th wheel trailer as my work lodgings. I also had a Winnebago Travato B-class camper van to use for vacations and adventures. Well, since I got the Oliver, and it's working so well, I don't need the 5th wheel. My initial plan was to put it up for sale after the Oliver was cold weather proven, but used 5th wheels are notoriously difficult to sell. My Travato camper van was an early unit and there have been some upgrades to it since introduction.
So in one fell swoop, I got rid of my 5th wheel and got a better camper van in one transaction. I traded both in for a new 2015 Winnebago Travato 59G. I feel I got fair value for both (as well as some cash back) and have largely completed my major downsizing plans.
The following is a video I made reviewing the details of this excellent camper van. Hope you enjoy it. Please leave a question or comment as appropriate.
Subscribe to:
Posts (Atom)