Saturday, April 30, 2016

Travato 59K Shower Curtain & Medicine Cabinet Mod

OK, this is the last of the mods for awhile.  Got thru my list, so now the rest of the year is for traveling and adventures.

A long while back, I bought these stainless eye hooks to make tie-down points on my boat.   Every time I move the van, I forget to open the medicine cabinet carefully and usually all the contents come falling out onto the floor.    So to secure things a bit better, I installed these hooks so a small bungee could be used to hold items in place.   All you need to do is drill some small pilot holes in the wood frame of the cabinet, and then screw them in.   Hook the bungee on them and you are done.


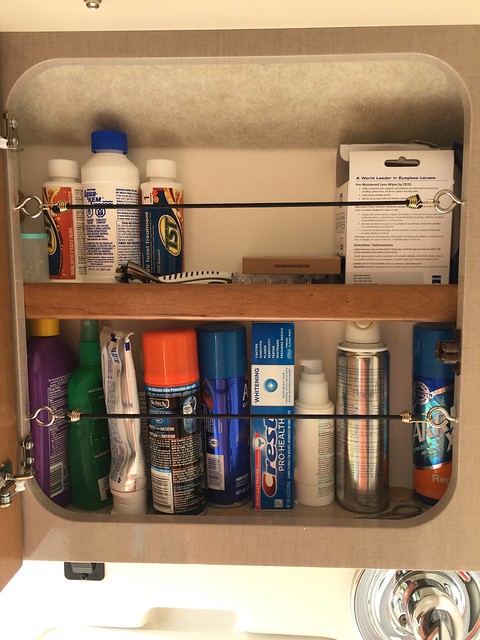
Could I have used smaller hooks?  Most definitely, but I had these laying in my toolbox.

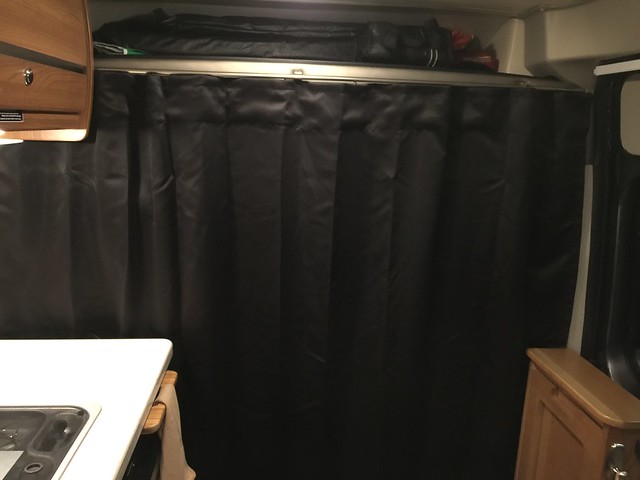
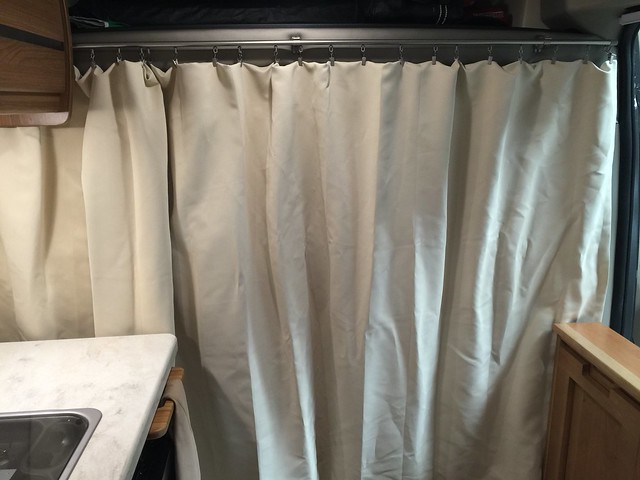
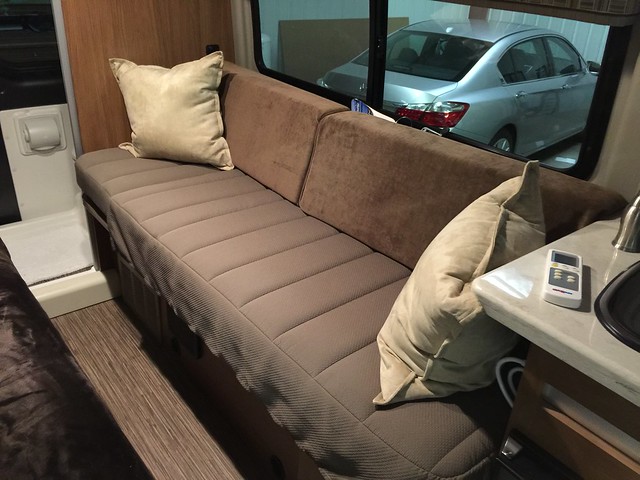
The last project on my list was to do something with the shower curtain.  All the snaps get tiresome eventually, and there is an issue of storing it while traveling and being able to air dry it after use.

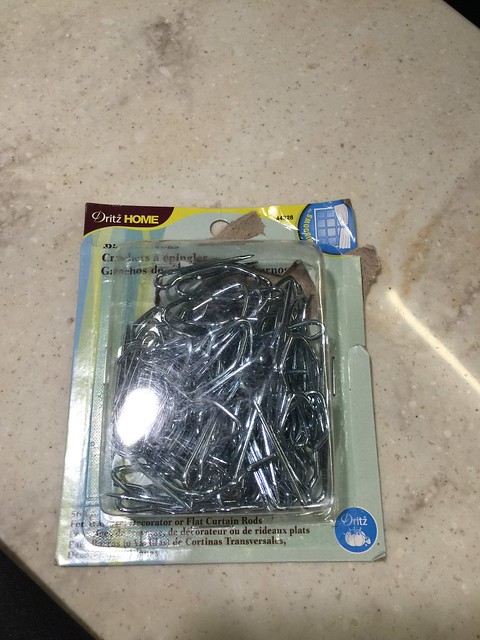
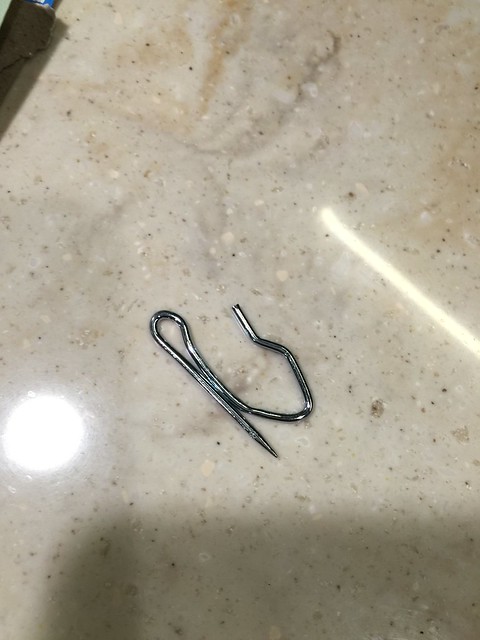
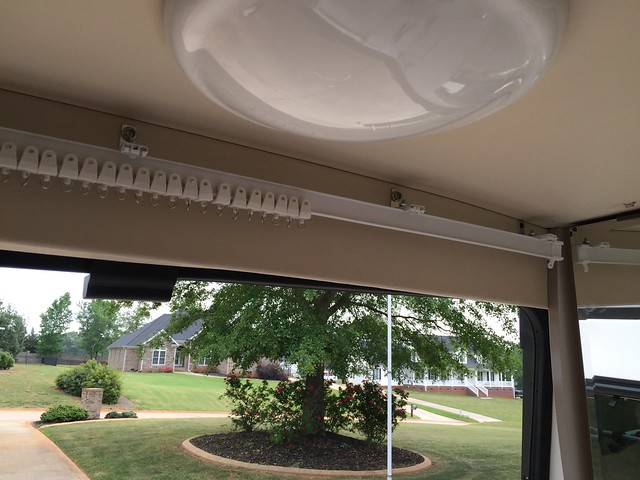
So after seeing a few mods owners have done, and seeing this Adjustable Curtain Track on Amazon, I decided to go ahead and do this mod.    This track is a plastic coated curtain track with a flexible metal inside it.  It comes rolled up and you need to straighten it out.   You cut it to length with a heavy duty pair of scissors.   The kit comes with the hangers, screws and the rolling trucks to attach your curtain.    I had some clip hangers left over from the cab curtain project, but you can easily buy those anywhere.

The track brackets look like they are intended to be screwed to the ceiling.   What I wanted to do was take advantage of as many existing screw holes as possible - the ones for the snaps would work fine, but they are on the walls, not the ceiling - so what to do?

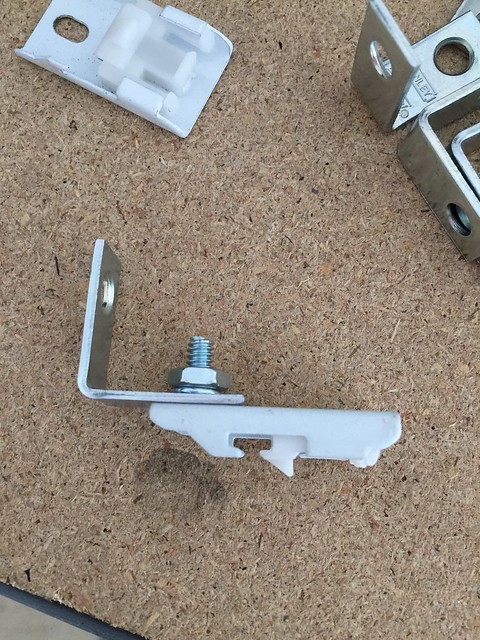
Well a trip to the hardware store of course.  I found some small L brackets and got some #10 1/2" machine screws, nuts and lock washers.


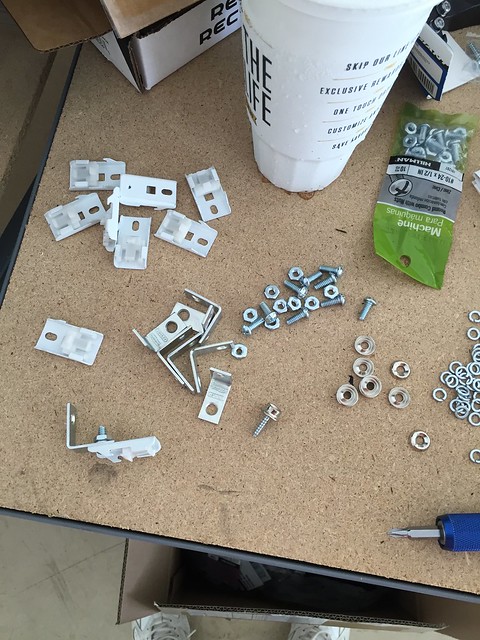
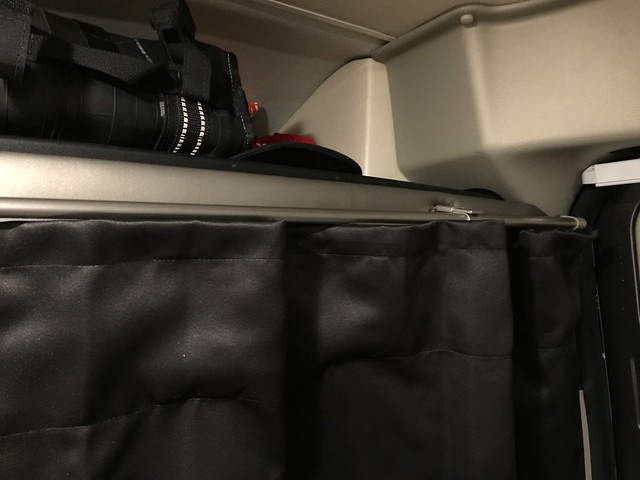
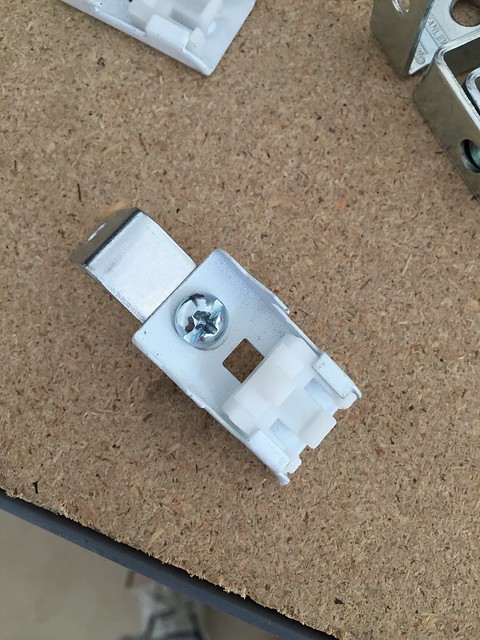
As you can see here,  I simply bolted these parts onto the track's ceiling brackets.  Note they have plastic spring clips to hold on to the track.  Here is one assembled in the orientation that they will be installed in.


Here it is all put together.  I did have to drill 3 new holes for some brackets - one on each end of the track, and one along the wardrobe cabinet wall.   It seems solidly mounted, as all the snaps were screwed into solid wood and not cardboard.  Who knows what the ceiling is made out of, so I was leary about drilling into it.


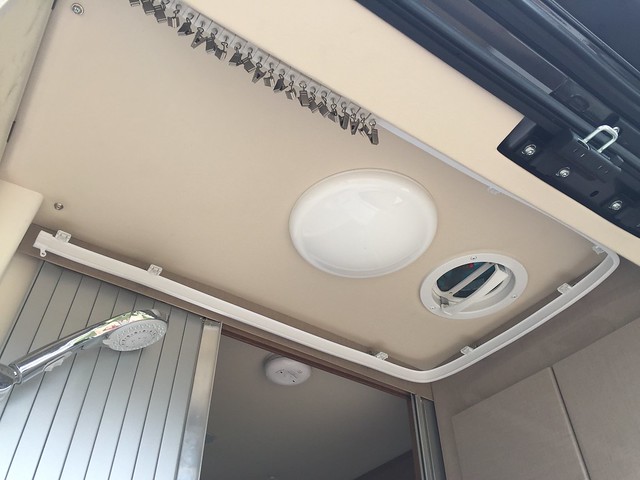
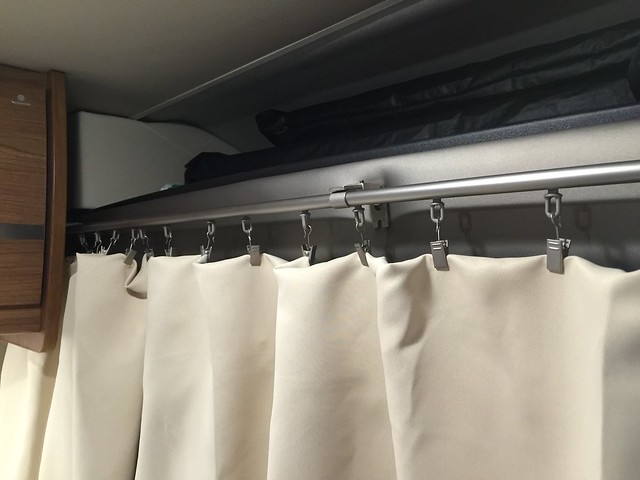
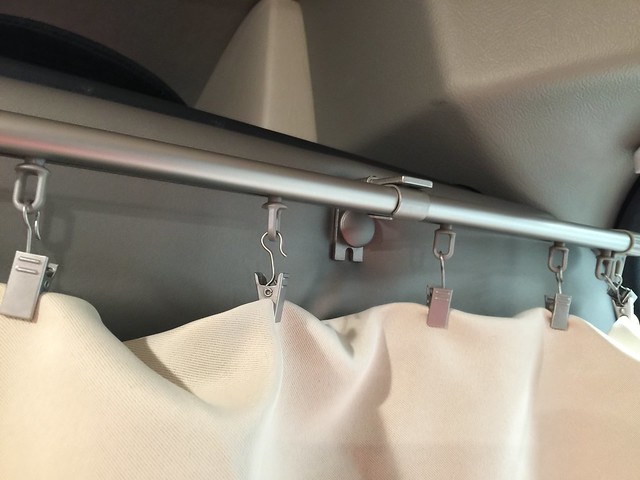
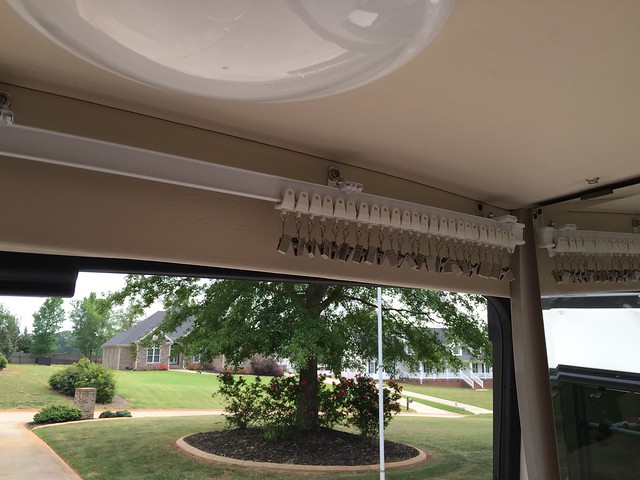
Here you can see the trucks on the track, and you can see the end cap at the end of the track.  It has a nice loop to secure the curtain at a fixed point.


By sheer luck, all the screw holes appear to be at the same height, so the track looks straight.


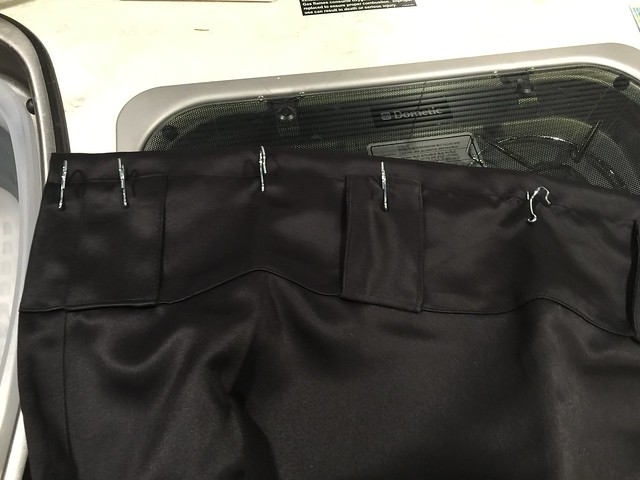
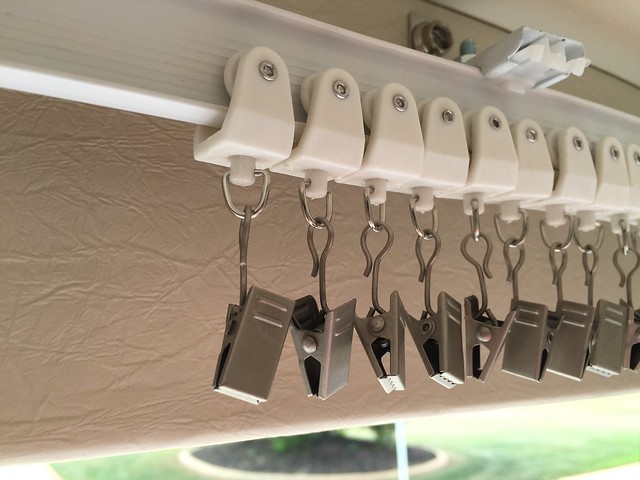
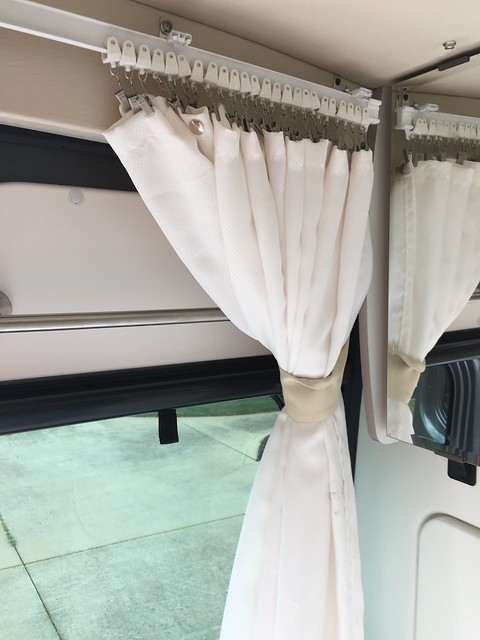
I put on all my clips on the trucks.   Another coincidence was the number of each was exactly the same - no leftovers.


To make sure they stay on, I used a pliers to crimp the hooks.


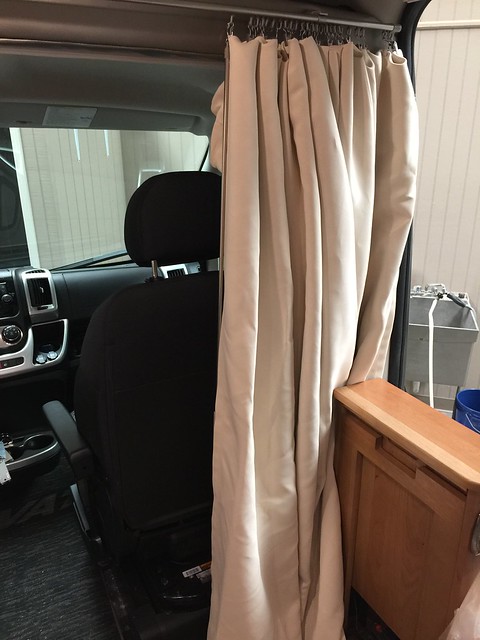
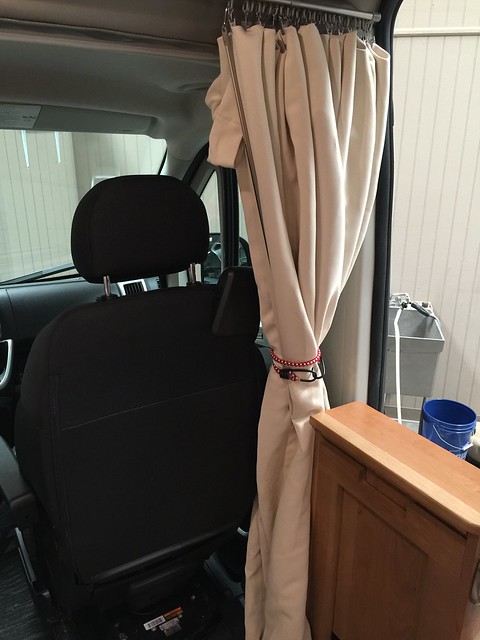
I clipped onto the curtain about every 3 inches.   My tieback loops over the end of the towel bar perfectly.


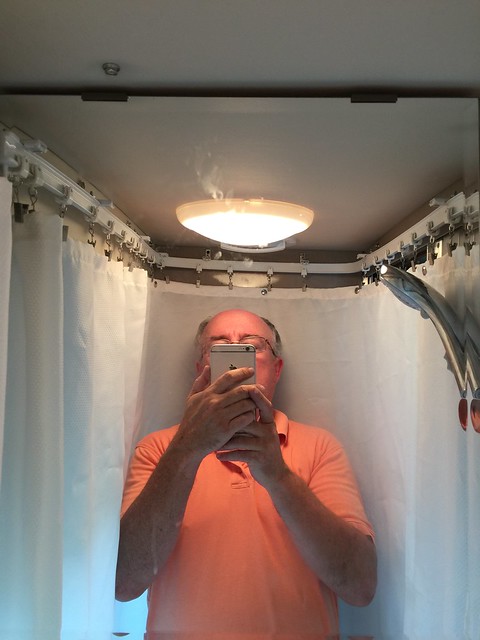
There's a strange fat man in my shower!


I'll probably still use the magnets to hold the curtain back against the back doors to get alittle elbow room - just as you would using the snaps.

Another plus to mounting this way is that you can leave the aluminum doors to the shower cubicle open for more ventilation.

The downsides?   The way I did this leaves the toilet and the medicine cabinet exposed.  Great if you need to place things like shampoo on the toilet lid.  Also great if you want to shave immediately after your shower.  Or if you need something out of the medicine cabinet.  If getting the toilet wet is a deal-breaker for you, then don't do this mod the way that I did.  I could care less if the toilet gets wet.


Friday, April 29, 2016

Stark Power Lithium Battery Upgrade for the Travato

Well this project was a long time in coming.  I hemmed and hawwed about it for a long time.  Was it worth the trouble and expense?  Did I really need the extra capacity?

I finally rationalized that it was.  Effectively, replacing my two Group 31 AGM batteries, I'd go from 110 ah of usable capacity to 225 ah and save 80 pounds of weight.  These new lithium ion batteries are actually LiFEPO4 batteries.  There are many different types, but this is what is going in all the RV's currently and many electric cars.  They are very safe for this use and are a different chemistry from the ones that caused fires in airliners and kid's hoverboards.

On my last battery project, I used the Smart Battery.   I changed over to the Stark Battery for several reasons.  First, the capacity is much higher - 125 ah compared to 100 ah.  Second, they have a much more sophisticated BMS.  Actually, the Smart Battery does not have a true BMS.  This one has thermal protection (high temp), as well as voltage protection, and cell balancing.  Third, the technology is different.  They use prismatic cells as opposed to the cylindrical cells.  All the batteries you'll find for RV application are prismatic.  My understanding is that it's a simpler design and results in a smaller overall package.  Fourth, and finally, the Stark battery is smaller and you can unscrew the top and get to the insides (the Smart Battery was sealed - you'd have to cut it open - yikes!).  I thought this might be handy, if in the future I want to put a temperature sensor inside.

With all that said, here is what arrived on my doorstep via Fedex.   It took 4 weeks from order to receiving my batteries.   Apparently, they make the various sizes of batteries in batches, so if one batch is gone, you have to wait for the next.  Turns out that bass fishermen love these things for their trolling motors - they were just cleaned out when I placed my order.   Here's another thing I like about Stark - their battery came well packaged in an actual box.  The Smart Battery came via a guy in a panel van - no box, no nothing.  Just handed me the battery, there ya go buddy.  Odd.

I like these Stark people.  The are just up the road from me in Charlotte, NC.


This is the label sticker.  Two things I think are in error.  The weight is much less than 39 lbs - more like 32.  Second is the initial charge.  The resting voltage I measured was 13.4 volts. That's a LOT more than 70%.


This is first rate packaging.  Lots of cushioning and room around the item in case the box gets beaten up - which one of mine was.


So, out to the shop and get this project going.  First is to raise the van up on my home-made ramps to get the old batteries out.  Love these ramps!


Here's one of the new batteries mounted to the slide-out tray.  It's well secured with the bar, but you don't want to tighten it too much or you may crack the polystyrene case.


These shots I took to show the difference in size between the Group 31 and the Stark Battery.  This will pay off later as I'll show you.


Side by side.


Inside the van (a Travato 59K), the converter/charger unit is located on a shelf under the curb-side bed.   Two tricks to not making that alot of work - using a screw gun with a long shaft screw bit - and not removing the bed deck from the van or all the Froli springs.  Just unscrew the deck, and slide it over until you uncover the converter.

Here's what you get from Winnebago these days - Progressive Dynamics PD9245C smart charger/converter.  Uses 725 watts and 4.5 amps.  You want to stick to these numbers so that you are not severely altering your electrical loads.  Otherwise, you may see some undesireable behavior with the EMS.  You could go over 30 amps under certain conditions and it will start shedding loads.  Also, if you increase the charging amps, you may also need to upgrade the wiring - a much more involved project since these wires snake around the bowels of the van and out thru the bottom.   I don't need such quick charging that I want to go to all that expense and trouble.


The wiring is really simple.  Two leads for the batteries, and a ground wire.


This item I had left over from my last project - the Progressive Dynamics Lithium Converter Charger model 9145L.  This is the same device you'd get in a Pleasureway Lexor with the new lithium setup.   What's cool about this device, is that dimensionally it is exactly the same as the 9245 that came with my van.  Also, all the wiring is the same, and the screw holes to mount it are the same as well.  So this change out is about as easy as it gets.  Also, since the electrical loads are the same, it will not effect my EMS.

Here it is mounted in place and ready to button it all back up.


Here she is under the van all mounted and secured.  Note that there is room around these batteries.  I think a project to install a temp sensor and insulate these batteries would be pretty easy so they could be used (charging) in cold weather (teens and twenties F).  You could even fit heating pads, as there is so much room.


Another thing to consider, since these batteries are so small, if you were so inclined, I think the bracketry could be reconfigured to enable mounting 4 batteries.  You have four large bolts hanging down from the floor of the van, sized to support two 76 lb batteries and the steel brackets.   If you could have new brackets made, you could possibly mount four of these batteries in this space.

Currently, I'm not using an inverter, so I'm undecided if I would want to go that far.  Something to think about in the fall I guess.

Monday, April 25, 2016

Viair RV Compressor Kit

About a year ago, I got this RV grade Viair compressor to carry in the van: Viair 400P-RV on Amazon.    I was carrying around a bulky compressor with a tank that required AC power and was quite noisy and heavy.

I never opened it, or had the time to fool around with it.  Until this weekend.  Both bicycles had flat tires and the car's tires were also low.   Being a beautiful, sunny day, I opened the box and dug thru the contents.

I must say, my first thoughts was that I was very impressed.  The hardware is substantial.  All metal fittings, housings, etc.  The gauge is heavy duty. 

What makes this an RV specific compressor is the duty cycle, it comes with two sections of hose and comes with the adapter to fill dual rear tires.  You can read the specs on the Amazon link, so I won't bore you with that stuff here.

To my amazement, this thing works so well, you don't miss that there is no tank.  When you turn it on, it will shut off it's motor if the line pressure is stabilized.  When you pull the trigger, it resumes operation to fill your tires.  You let off the trigger to measure your tire's pressure. There is also a bleed-off valve to release pressure if you go above your target.

Another thing was the sound.  It is not loud (my guess is 45 dB) and it's a very low frequency.  Very pleasant sound and would not interfere with conversation if you were talking with someone.  The base has a vibration isolation foot.   I suspect that also keeps the noise down and also prevents it from moving around if you set it down.

Here you can see all the parts in the kit - the bag, the compressor, the two hose sections, the dual adapter filler, the trigger with the regular fill hose.   This fill hose is a threaded connection, not a quick release.  You twist it on your stem and then pump.  It also comes with some adapters to fill balls and sports equipment.   The power connection is via alligator clips to your battery.   I suppose you could change that to use a Battery Tender pigtail if you had one of those mounted, or a cigarette style adapter.  It comes with neither.


Note the trigger and fittings are all metal - no plastic "metalized" parts.


I was pretty impressed with this gauge.  It's dead on with my regular pressure gauge.


Alligator clips to connect to your battery.


Brass fittings to connect hoses.  You don't have to use both sections - you can connect only one if you don't need the length.


Everything fits loosely in the bag, not a tight squeeze like some things you buy that don't want to go back in their bags - like inflatable kayaks!


I honestly did not think the hoses would go back in their dedicated pouches.  But they did easily!


Nice compact package in a canvas bag.  Perfect for throwing in the trunk, in the cabin or a cabinet.  Love it!


Saturday, April 9, 2016

Finally, the Right Curtain

I wasn't exactly thrilled with how the beige curtain worked out.   It hung too low on the rod (letting light leak thru) and it was too much material (too wide and too long).   So I found another curtain, in black on Amazon: 84" W x 63" Long Blackout Drape.  This one fits perfectly without any need to cut or hem.   I paid $25 for it.   I did notice that it was the last one in this size, so if you click the link, they want over $100 for it.  Keep watching it, as the price will come down when they are re-stocked.   To hang it, I bought these hooks: Drape Pin Hooks.  Figured that was the easiest way to hang it.

Here it is hung up.  Enough to cover the width and not be stretched too tight, yet not so much material that it bunches up.


The hooks came in a pack of over 50 - plenty for this project and maybe another.


They are quite small.


You just hook them thru the back piece of material every 3" or so.


I like that it fits flush with the rod.


It blacks out much better.  Not perfectly steath as you can still see a little light, but in fairness, that light is shining right above the curtain.  If you only had a light on in the back, you might not see anything here in the front.


Much smaller bundle bungeed up than the last one.


I'm quite happy with this.  So I'm declaring it done for now.

The Perfect Camp Chair?

I've been a big fan of the Pico chair for a couple years now.  They are extremely durable and compact.   I have 6 of them and not a one has had any issues or damage.

But recently, another chair has come to my attention.  The Helinox Chair.   These are the Helinox Chair One.   I also got a cool collapsible camp table.   This one is not the expensive Helinox model (that was $100+!)  This is a cheap Chinese knock-off, but it seems to be well made.


The Pico chair is small, but these are tiny in comparison.


You sit a bit lower and the seat is not as wide.  But it's alot lighter - only about 2 lbs compared to the 10 lbs of the Pico.


The table supposedly will hold 30 lbs.   It seems strong enough for what I'll use it for.


The chair seems to be comfortable enough.  I think I'll keep these in the van and put the Pico chairs on my boat.


Uh, oh.  Here comes the boss.  Back to work!

Spotlight Installed on the Ranger Tug!

Behold!


They put the control on the upper cabinet as recommended by Ranger.


I don't think it looks too big.   I've yet to test at night, but I don't think it's casting any light on the deck.


It was quite the ordeal going down to Charleston to pick it up.  Had bad wrecks each way - one had us sitting on the interstate at a dead stop for over an hour.  Windy as all get-out.  Only could manage 9 mpg.

Very happy with the job my dealer (Longshore Boats) did and the support from Ranger Tugs.   In the end, besides my time and the cost of fuel, was $0.  That was a happy surprise.

Tuesday, April 5, 2016

New curtain system & cushions for the Travato


While I am waiting on my new batteries to arrive, I've been able to fool around with a few minor projects.  Tweaks is more what they are.   I've tried a few different setups for a cab curtain.   On the newer Travatos, the bulkhead has soft padding and there are 3 snap-screws holding this material in place.  On the old vans, there is only a screw on the outer edges of the hard plastic.  

I like the idea of a curtain at the back of the cab for quick privacy and not have to set up the fiddly window covers.   But what I also wanted was an install that didn't require drilling any new holes.   I like things to be reversible if I change my mind later.

I bought this curtain rod  a few months ago.  I wanted something that could be mounted, but also hold the curtain securely (that wind or the occasional quick pull wouldn't easily take down).  Also needed something that would extend the full width of the van, edge to edge, but wouldn't interfere with the screen side door.   I think this may be the one.

I just folded over my old curtain to hang it.  It will need to be hemmed too.   I also have a black curtain that may work better.  In my Travato G, that seemed too dark to use.  The K may be a different story as there is so much more light inside with all the windows.  Here it is hung in place.

What I did was remove the snap-screws that are mounted to this upper bulkhead at the back of the cab section.   They are used to hold this padding in place and are quite long - about 2".   Simply back them out, and then re-install with rod support brackets.   The can screw down quite tightly, so I have no doubts these three screws will hold the rod adequately.   The curtain is held with clips that came with the rod.


The silver of this rod is a pretty good match to the color of the vinyl padding.


What I like is that the curtain glides down the rod and is easy to bunch up on one side or the other.

You can just bungee it together as a tie-back.


Since this is an adjustable rod, you can bring it all the way out to the vans walls.   I didn't do that on the passenger side, as you need to have clearance for the screen door.  As you see here, plenty of room, yet the opening is still covered by the curtain.


Seen from the outside, there is still a little light shining thru at the top.  Not exactly stealth, but OK for privacy.   I think this can be solved with different hooks or clips to close that gap with the bottom of the rod.


Another thing I wanted to do was change out my "sofa" bolsters.   The brown color doesn't quite match the bottom cushion, so it looked odd to me.


So I went back to the company that I ordered the old ones from and got a different color.  Along with these different Sunbrella patio pillows, it's a lot brighter look.


They call this a twill fabric.  It's soft and appears a durable micro-fiber.   Believe this can be removed and thrown in the washer to clean it.